The music industry’s “loudness wars,” where everyone wants THE LOUDEST POSSIBLE RECORDING, has resulted in a lot of collateral damage — like distortion, listener fatigue, and no dynamic range. But the loudness wars aren’t just part of our industry, as you know if you’ve been watching late-night TV and out of nowhere, the commercial for Honest Bob’s Mostly Working Used Cars sounds 10 times louder than the show that preceded it. In a panic, you dive for the remote to turn down the volume before the neighbors file a noise complaint, but then you have to turn the volume back up again when the program resumes.
Well, the European Broadcast Union (EBU) hated that about as much as we did, so they decided to do something about it. But in the process, they also made it easier for us to master a collection of songs or an album. Here’s how they did it.
A Peak Experience, on Average
There are two main ways to measure audio levels: peak and RMS (Root Mean Square). Peak measures the highest level the audio produces (even incredibly short duration peaks), while RMS quantifies the average level. RMS correlates more closely to our hearing. For example, a snare drum hit has a high peak value, but a sustained power chord — with its high average value — will sound subjectively louder even if its peak is nowhere near as high as the snare. If they both have the same RMS level, they’ll sound more alike in terms of loudness.
To match levels in an album, some people normalize all the tracks to the maximum peak value. However, this is rarely effective, because a song with a higher average level than the others will sound louder. Others normalize to an RMS value, but then you may have peaks that go above 0, so you have to pay attention to overall levels as well. Ultimately, the best way to match levels is usually subjectively. One technique is to normalize all the tracks to hit the maximum peak value to take advantage of the available headroom, decide which one sounds the softest, and then turn down the levels of the louder ones to match the softest one as best you can. That’s not a particularly scientific option, but with enough trial and error, you can achieve a satisfying balance.
Enter LUFS
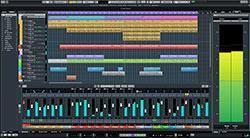
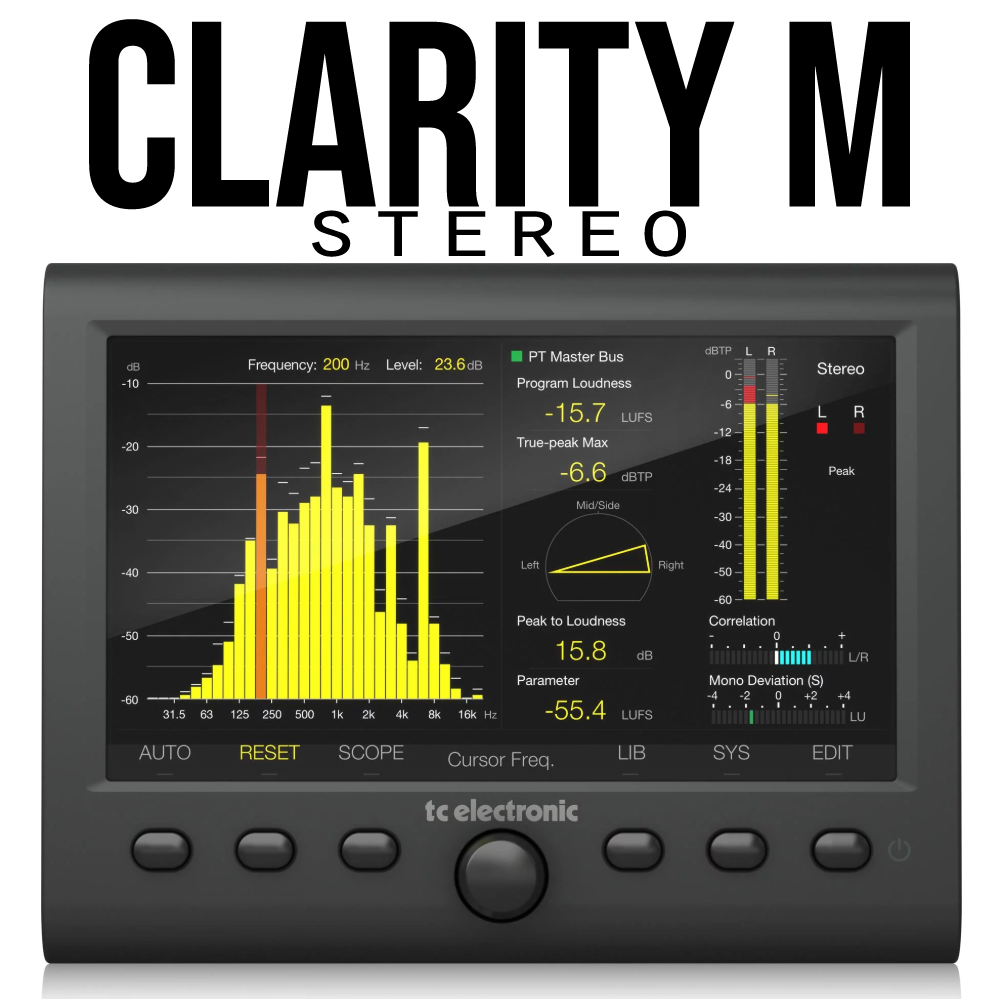
There’s lots of reference material on the web about the EBU R128 standard — how it was derived, the numerous variations, and the nuts and bolts behind it — so let’s stick to practical applications. Basically, we now have loudness meters whose capabilities extend conventional VU, or peak, meters and are based on a spec called Loudness Units. LUFS stands for Loudness Unit Full Scale, which references Loudness Units to full scale (i.e., the maximum level a system can handle). Steinberg Cubase, PreSonus Studio One Professional, Magix Samplitude, iZotope Insight, and other programs now include this type of metering.
In a nutshell, Loudness Units are the unit of measurement used in the process of quantifying a piece of music’s perceived loudness by analyzing the average level over time. In theory, two pieces of music that register identical LUFS readings should sound like they’re at the same level, and in practice, they do indeed sound like they’re at the same level, regardless of whatever the peak or RMS readings say. So we have an immediate, practical benefit — if you’re mastering and want consistent levels among tracks, check their LUFS readings.
Readings are a negative number, like -5 LUFS, -10 LUFS, -13 LUFS, etc., because they’re referenced to full scale. The less negative the value, the higher the average level. But here’s the beauty of the system: a broadcaster like YouTube can decide on a standard LUFS level so that people don’t have to mess with the volume constantly, and simply adjust all audio to hit that LUFS level. (Although some companies may use proprietary ways of checking levels, the results are more or less the same.) Sure, you can still squash the living daylights out of your audio and generate something that’s -5 LUFS, but YouTube will dial it back to -13 LUFS so that it’s the same apparent level as everything else. Or if you have a jazz track with a wide dynamic range that registers -18 LUFS, its level will be raised to -13 LUFS. So that hardcore Belgian techno track from 1990 will have at least close to the same perceived loudness as a string quartet recording.
For broadcast, the recommended standard is -23 LUFS — but that’s different from mastering music for playback. We often make subjective calls about how much dynamic range we want, and we can master to whatever LUFS we want. In fact, I feel the idea of starting off with the goal of hitting a specific LUFS number is not ideal — I prefer to master to what sounds good to me, without being concerned initially about LUFS. Sometimes it’s a higher number, sometimes a lower one; it depends on the material. But after getting something that “sounds right,” analyzing where it sits on the LUFS scale makes it easier to fine-tune the levels of other tracks so that they’re consistent.
Also consider that playback over a streaming service, or from a CD or download, is different. With CDs, you can master as loud as you want, but I think past -9 LUFS you’ve lost most of the dynamic range. For club tracks, you might want to master to an even higher average level, like -6 LUFS, because there’s no standard level for clubs like there is for broadcasters or music delivery systems such as YouTube. But again, when your track gets broadcast, it will theoretically have the same perceived level as other music.
For what it’s worth, I master my “rock meets EDM” music to around -11.4 LUFS, which seems like the sweet spot between dynamics and being able to rise above the background noise. When compared to a song cut at -6 LUFS (fig. 1), mine sounds much softer. But matching the -6 LUFS song to -11.4 LUFS not only makes the perceived loudness the same, mine actually sounds subjectively just a tiny bit louder because it has more dynamics.
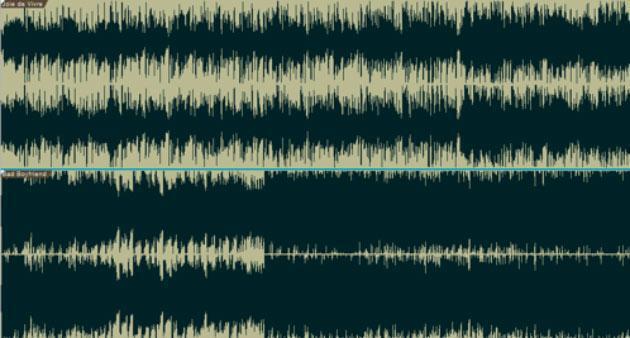
Figure 1: Without LUFS matching, the lower waveform sounds much louder. With LUFS matching, even waveforms this different have the same apparent level.
Of course, if the two cuts are used to create audio for car playback (via USB stick or CD), the -11.4 LUFS one will sound softer. Fortunately, thanks to modern technology, many car audio systems have a fantastic new feature called a “volume knob.” This lets you set the level as loud or soft as you want, while preserving the audio’s dynamic range! Amazing, eh?
A Practical Example
My recent “Joie de Vivre” project (which goes live on November 11) is one continuous set, so it’s very important to have consistent levels from one cut to the next. Here’s the workflow I use to do this with albums. Remember, this is not about mastering, but album assembly — your music should sound like what you want before you begin assembly. I use the Waves L3 to fine-tune the perceived average level (it works very well for this), not do song mastering per se.
- Mix each track down to a stereo file, with no master bus compression or limiting.
- Peak normalize each track to -1.5dB (before you go online and say I’m an idiot who knows nothing about audio because I’m peak normalizing all the tracks, keep reading). Having a little bit of headroom allows for fine-tuning levels later, if needed.
- Bring each track into Studio One’s Project page for album assembly.
- Check the LUFS of the unprocessed tracks. Mine typically hit around -17 to -23 LUFS, which indicates they don’t all have the same perceived average level.
- Insert a Waves L3 Multimaximizer (fig. 2) into each track to allow consistent adjustment of each track’s average level.
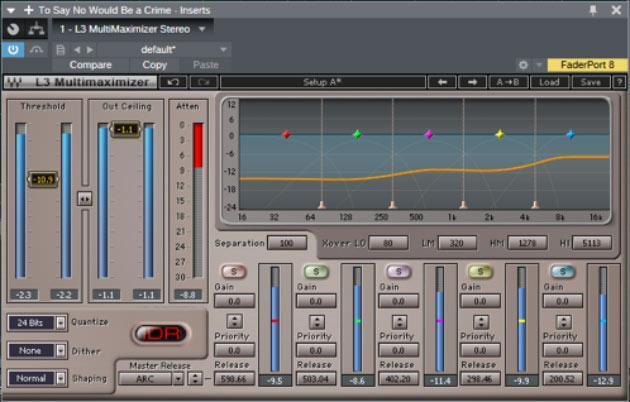
Figure 2: The L3 is excellent for adjusting the amount of dynamics processing needed to ensure a consistent LUFS reading. That may look like there’s a lot of gain reduction, but the tracks don’t use up the maximum available headroom — so some of the reduction is just to get the processing to the point where there are peaks to reduce.
- Set the amount of maximization for each track so that the processed audio’s LUFS reading is -11.4 (again, this is a personal preference for this particular project, not a rule). Studio One’s metering shows the LUFS both before and after any processing, including level changes. After making any kind of change, the metering tells you to update the reading. So I tweak the amount of maximizing, update, tweak, update, etc., until each track reads -11.4 LUFS.
The LUFS algorithm is more complicated than just sticking a meter on something (for example, it knows not to include a fadeout as part of what should be measured), but all those calculations happen in the background. In the case of “Joie de Vivre,” the end result after listening to the edited tracks was that they all had the same perceived average level — the tracks that needed more maximization to attain the same average level got what they needed, and the tracks that needed less had less.
So we’re done, right? Well…no. Here’s an analogy for all you guitar players: even though a Plek machine can dress a guitar’s frets and cut nuts with computer-controlled precision, you still need a human being to look over the results and make any judgment calls about potential tweaks.
More Metering
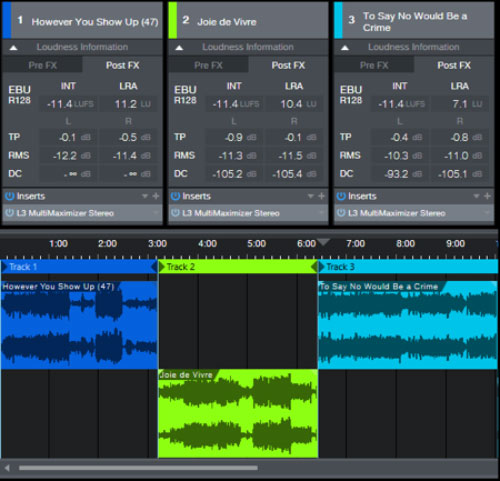
Studio One Professional’s metering (fig. 3) shows four other important parameters. These provide data that may cause you to go back and make some changes in the track, the levels, or the amount of maximization (if you use the same kind of approach I do).
LRA is a reading of dynamic range. The typical range is from 5 (very little dynamic range, like a commercial or aggressive club mix) to 15 (a live acoustic recording). I use this as a reality check to the LUFS reading. Most of my music has a dynamic range rating between 11 and 8, which leans toward a somewhat limited dynamic range so the music “pops” a little more. However, I noticed one song was a 7, so I looked at it further, even though, subjectively, it seemed to be the same level as the other tracks. It turned out that it was a dance mix without much of an inherent dynamic range, so I didn’t make any changes — but it’s helpful to get that kind of feedback.
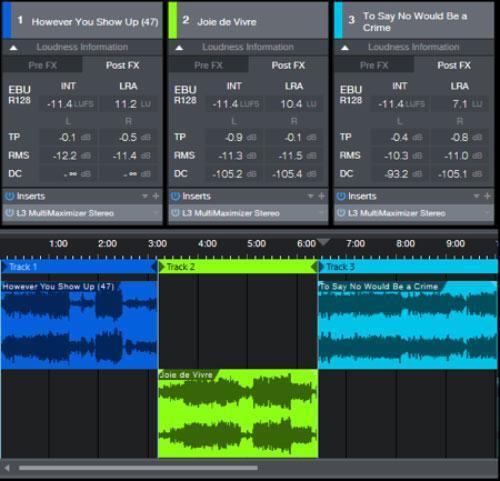
Figure 3: This shows the meter readings for the first three tracks from the “Joie de Vivre” project. Note that the LUFS readings are identical, and the RMS values are very close. The third song has a lower LRA reading (i.e., less dynamic range), but as you can see from the waveform, it indeed has less dynamic range than the first two tracks.
TP stands for “true peak,” and it takes intersample distortion into account (i.e., the distortion that can occur when reconstructing the signal through a D/A converter’s smoothing filter — even though a peak meter that measures sample levels doesn’t show distortion). Well, I’m not a fan of distortion, so I want the TP reading for both channels to be -0.1 or lower. Although there were only a couple of tracks with elevated TP readings (e.g., +1.2dB or +0.6dB), the fix was reducing the track level and then readjusting the amount of maximization to bring up the perceived level a bit to compensate for the reduced overall level.
RMS gives the old-school RMS reading, which I still believe is important. It’s another way of gauging the signal’s dynamics, so I look for consistency among the various tracks. If anything deviates by more than a few dB, I check back to the original track to verify whether the difference is intentional or not.
DC shows the track’s DC offset. Typically, it’s -infinity, but sometimes I’ll run into a tiny bit of offset, which isn’t too terrible. If there is significant DC offset, knowing this is important because it will mess up the track’s headroom, and you’ll have a hard time matching levels properly. You can go back to the original track and eliminate the DC offset, which will then allow any limiting or maximization to work more efficiently.
Do We Need to Generate a Zillion Different Masters Now?
Given that different outlets normalize to different standards (e.g., YouTube’s -13 LUFS vs. iTunes -16 LUFS), does this mean you need to produce separate masters for each outlet? Well, decide for yourself. Turn the level up or down on your track until it hits the target level (e.g., with my -11.4 LUFS tracks, I turned down the volume so they hit -16 LUFS to hear the difference if they were played on iTunes). At least to my ears, it didn’t make enough of a difference to justify the effort. Also, if you decide to release your music through an aggregator, you would need to create separate masters for CD, download, and streaming, which could turn into a logistical mess. Just make the best music you can, with the desired dynamics, and let the chips fall where they may once it gets to the listener’s ears. Hopefully their playback systems have that new-fangled volume control feature we mentioned earlier.
Yes, This Really Is Pretty Cool…
Purists can get upset that we’re supplementing our subjective evaluations of levels with an algorithm. But it’s a very effective algorithm. It used to take me hours to balance levels correctly on an album. Now it takes about 30 minutes, including additional tweaking.
Granted, the album format isn’t as popular as it once was, but song collections are still common, and LUFS metering can help with consistency. But perhaps more importantly, in today’s singles-oriented world, LUFS encourages a truce in the loudness wars — you can’t crank the maximizer up and have your song sound louder on Spotify, because Spotify will just turn it back down again. And if you appreciate music with dynamic range, Spotify will make sure it sounds subjectively as loud as everything else — just with more dynamic range. This is indeed progress.








Leave a comment
This site is protected by hCaptcha and the hCaptcha Privacy Policy and Terms of Service apply.